Plumbing a water softener involves several crucial steps to ensure proper installation and functionality. A water softener removes minerals like calcium and magnesium from the water, which helps prevent scale buildup and improves water quality. The installation process requires careful planning and accurate execution to ensure the system operates effectively.
In this guide, we will walk you through the essential steps to install a water softener, from preparing the site to final adjustments. Proper installation will help avoid common issues and ensure the system provides optimal performance.
Gather the Necessary Tools and Materials
Before beginning, collect all the tools and materials you’ll need. This typically includes a wrench set, pipe cutters, Teflon tape, and fittings. You will also need a water softener unit, a bypass valve, inlet and outlet pipes, and a drain line. For those who use plumbing estimating services, ensuring that you have all the correct parts beforehand can save time and prevent delays.
Having everything ready will streamline the process and reduce the likelihood of mistakes. Double-check your list and ensure all items are compatible with your water softener model.
Turn Off the Water Supply
The first step in installing a water softener is to turn off the main water supply to your home. This will prevent any water flow during the installation process, minimizing the risk of leaks and water damage. Locate the main shut-off valve, usually found near the water meter or where the water line enters your home.
After turning off the water, open a faucet in the house to relieve any remaining pressure in the pipes. This step ensures that no water will spill out while you’re working on the system.
Choose the Location for the Water Softener
Select an appropriate location for your water softener. It should be close to the main water line and ideally near a drain for the discharge line. Ensure the area is accessible for future maintenance and service. The location should also be away from extreme temperatures and potential sources of water damage.
Proper placement helps with efficiency and longevity. Consider the space required for both the softener and its associated components, such as the brine tank.
Install the Bypass Valve
The bypass valve allows you to redirect water flow around the softener if needed. This is essential for maintenance or repair without disrupting the water supply to your home. Install the valve according to the manufacturer’s instructions, ensuring a secure fit.
The valve typically mounts directly to the softener’s inlet and outlet connections. Make sure it is positioned correctly to allow smooth operation and easy access when needed.
Connect the Inlet and Outlet Pipes
Connect the inlet and outlet pipes to the water softener. These pipes direct water into and out of the softener. Use appropriate fittings and ensure they are tightly secured to prevent leaks. Apply Teflon tape to threaded connections to create a watertight seal.
Check the manufacturer’s guidelines for any specific requirements regarding pipe connections. Proper installation is crucial for the softener’s efficiency and to avoid any potential water damage.
Install the Drain Line
The drain line is used to remove wastewater from the regeneration process. Install this line according to the manufacturer’s specifications, ensuring it leads to a suitable drain. This could be a floor drain, a standpipe, or an external drainage system.
Make sure the drain line is properly secured and does not have any kinks or obstructions. This will prevent any backups or leaks during the softening process.
Connect the Overflow Tube
The overflow tube prevents the brine tank from overflowing by directing excess water to a drain. Install this tube according to the instructions provided with your water softener. Ensure it is properly secured and directed to the drain area.
Check that the overflow tube is not obstructed and is functioning correctly. This will help prevent potential water damage and ensure the system operates efficiently.
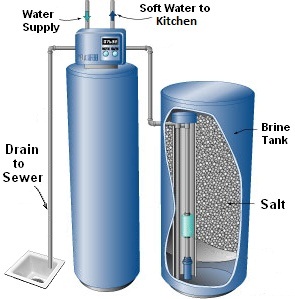
Attach the Brine Tank
The brine tank is where the salt is stored for the regeneration process. Position the brine tank near the water softener and connect it using the appropriate hoses and fittings. Ensure the tank is level and stable to avoid any tipping or spillage.
Fill the tank with salt according to the manufacturer’s recommendations. This will be used during the regeneration cycle to remove hardness minerals from the resin.
Test the Connections for Leaks
Once all connections are made, turn the water supply back on and check for leaks. Inspect each connection, including the bypass valve, inlet and outlet pipes, drain line, and brine tank. Tighten any fittings as needed to stop leaks.
Running a test ensures that everything is correctly installed and functioning as intended. This step is crucial to prevent water damage and ensure the softener operates effectively.
Set Up the Water Softener Settings
Configure the water softener settings according to the manufacturer’s instructions. This includes setting the hardness level of your water, the regeneration cycle, and the time of day for regeneration. Follow the provided guidelines to ensure the softener is programmed correctly.
Proper settings will optimize the performance of your water softener and ensure it meets your household’s needs. Adjust as needed based on your water usage and hardness levels.
Conclusion
Proper installation of a water softener is essential for efficient operation and long-term performance. Following these steps ensures that the system is correctly plumbed and set up to effectively soften your water. Regular maintenance and periodic checks will help keep the system running smoothly.
A well-installed water softener not only improves water quality but also extends the lifespan of plumbing fixtures and appliances. By carefully completing each step, you can enjoy the benefits of softened water in your home.